A visually appealing photo is a MUST when selling hats. Your photo needs to be clear, bright, vibrant and detailed.
Often when you take a photo (unless you are using a proper photography set up) it can appear dull and a bit dark. A brighter photo can help to show details on the hat that may otherwise be missed. Luckily there’s a quick and easy way to brighten your photos.
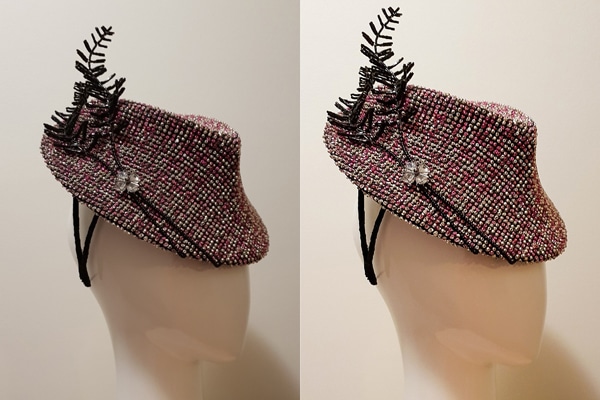
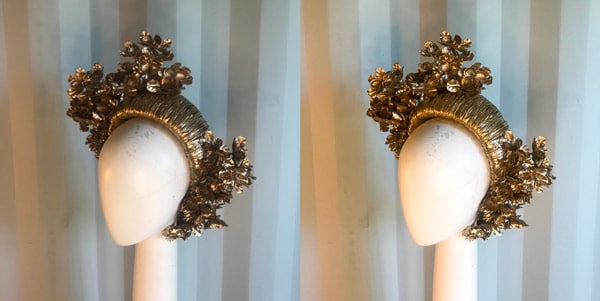
Image: Katherine Cherry Millinery, before and after brightening photo
Before we start, it’s important to note that when brightening photos of products you are selling, the end result should still give a true representation of what the product looks like. Don’t saturate your colours too much so that they look unrealistic or even completely different. This is so important when selling hats, as customers are relying on the photos shown to see what the product will look like and will often match specific colours in their outfits.
Below are seven easy steps to enhance your photos.
1.Download Adobe Lightroom App
I use an App called ‘Adobe Lightroom Photo Editor’ which is free to download from the App store.
Once you have downloaded this app, here’s how to quickly and easily brighten up your photos.
2. Select Your Photos
Open the App, tap on ‘Photos’.
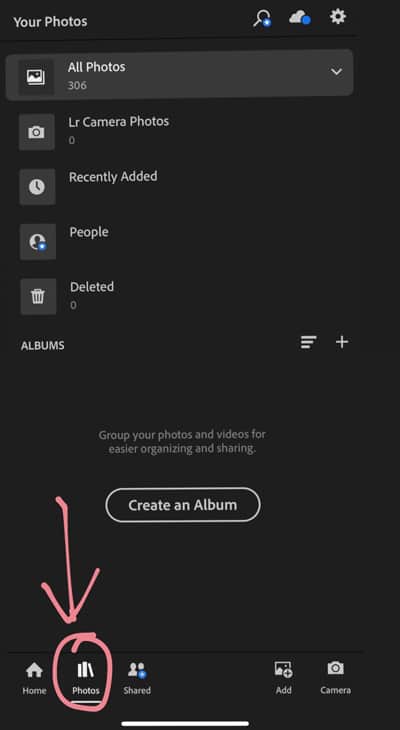
Then tap on ‘Add’.
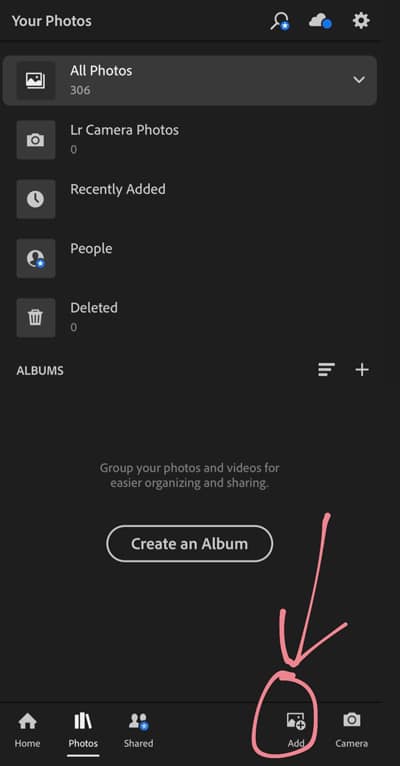
Tap on ‘From Camera Roll’. This will open your photo albums from your phone. Select the photo you wish to edit. It will open up your photo, ready for you to edit.
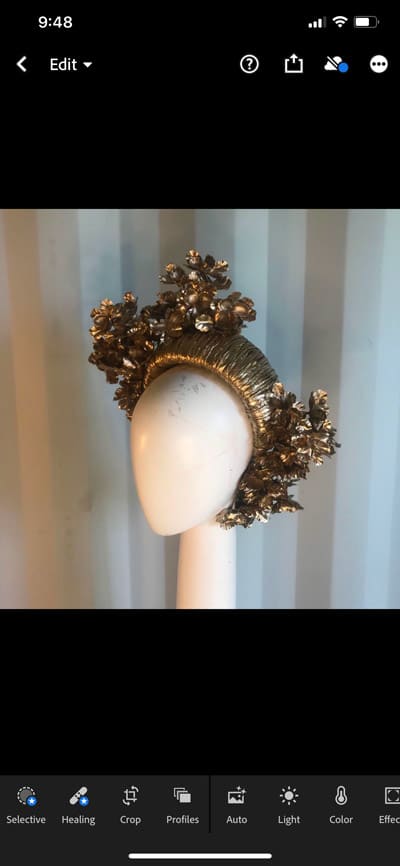
Image: Claire Hahn Millinery
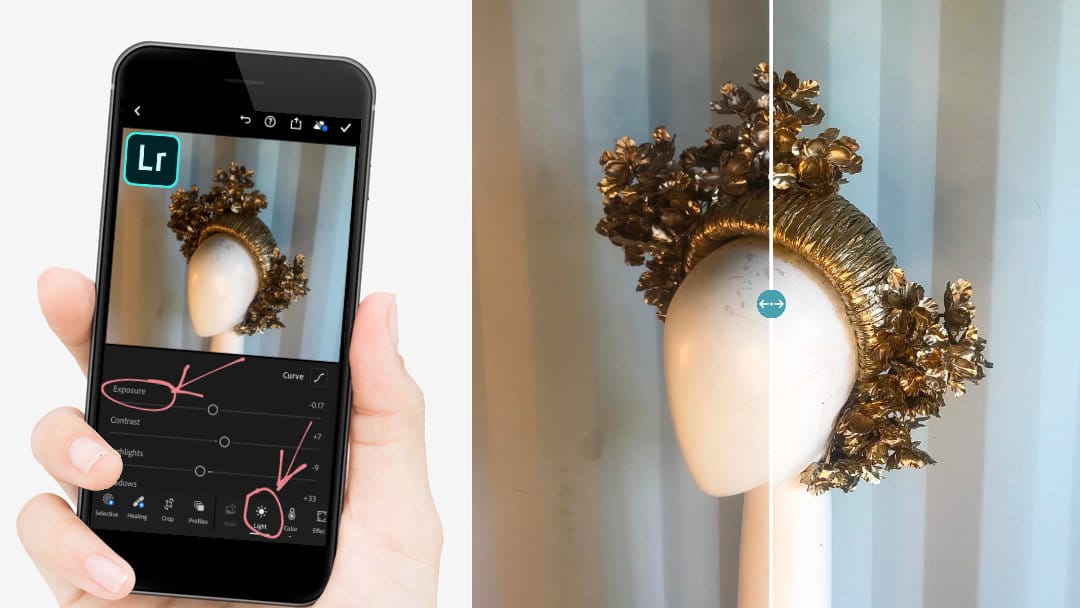
3. Make Your Photo Brighter
The first thing I do is tap on ‘Auto’. This is an automatic setting that edits the photo for you, but I often find even then, this can make the photo too dark still. It is good however to use as a base, which you can edit on top of.
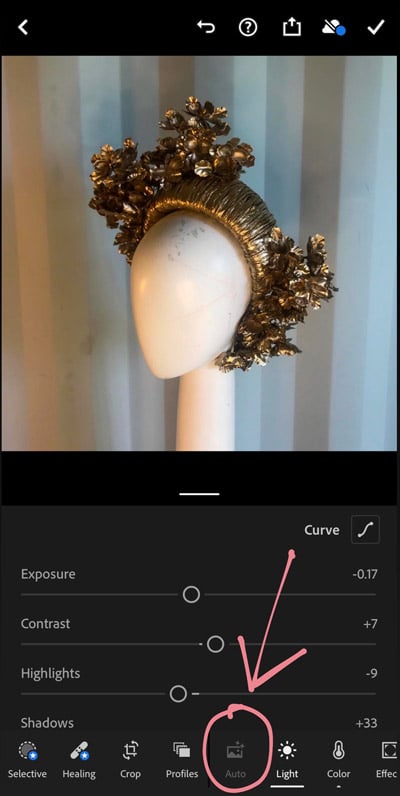
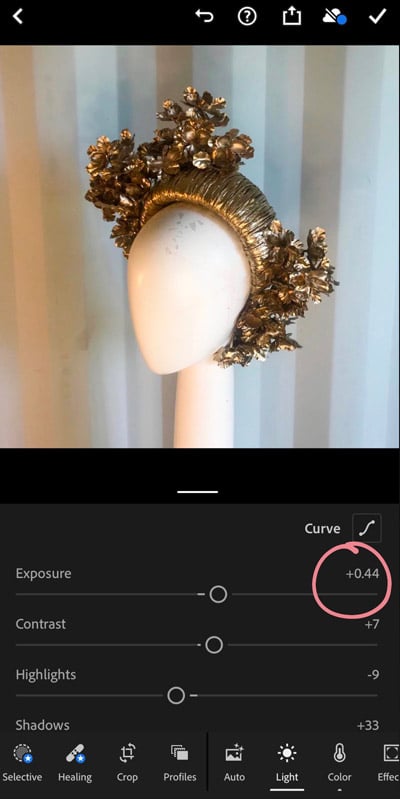
Next tap on ‘Light’. The top line is ‘Exposure’, this is what will make your photo brighter.
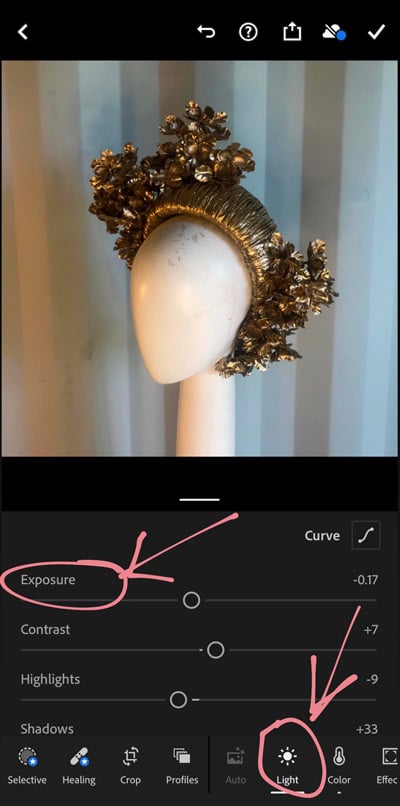
Slide the bar to the right to make the photo brighter.
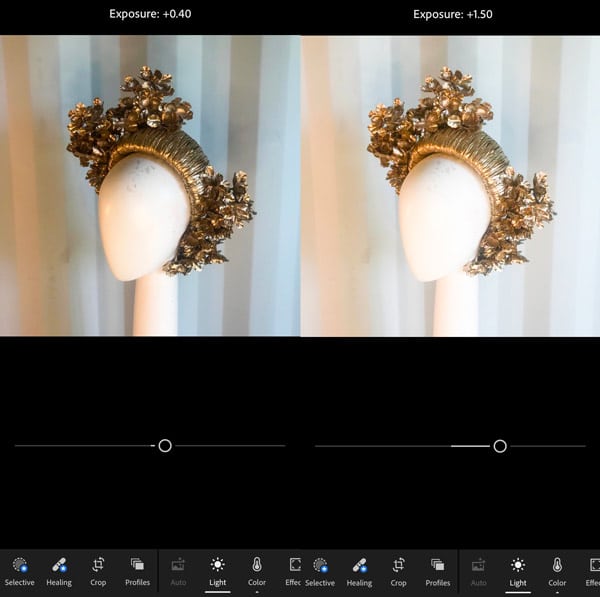
Sliding the bar to the right just a small amount will make it just a little bit brighter, and sliding it further across will make it much brighter. Having a brighter photo is great, but making it too bright can also change the colour of your hat. This hat above is a vintage gold, but upon brightening it (to +1.50 exposure), it can make the hat appear more of a yellow gold, which is not true to colour and will confuse customers who are trying to colour match.
I like to keep my exposure anywhere up to +0.44.
4. Enhance Your Colours
When taking a photo, sometimes a hat’s colours can get lost and dulled down. Enhancing your colours is a great way to edit the photo so it looks more true to colour with your actual hat.
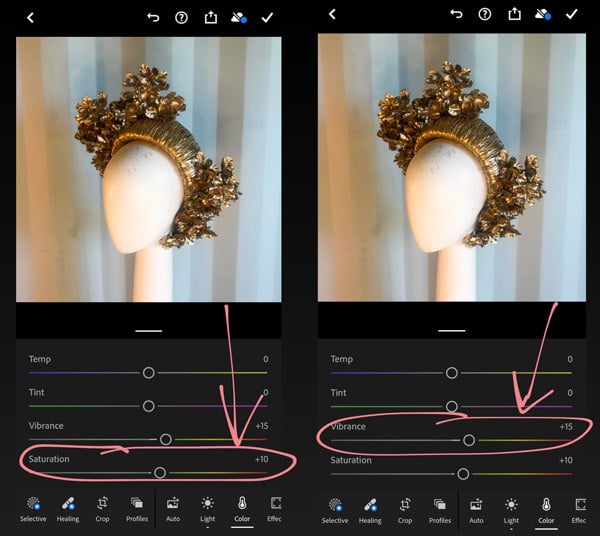
The next edit I will do, is to the colour. Tap on ‘Color’. This makes your photos more vibrant.
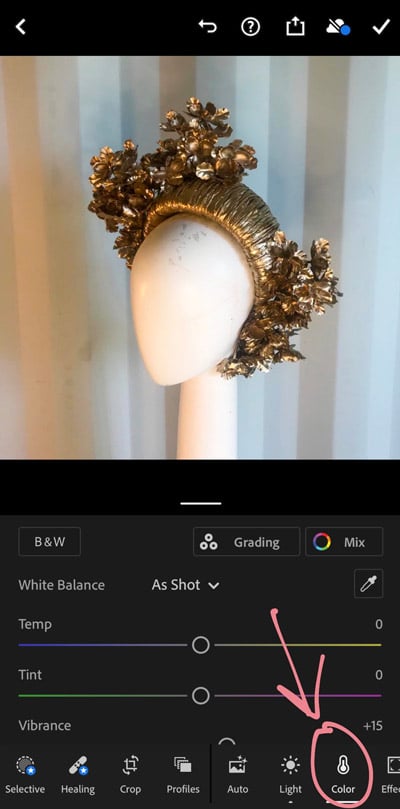
I like to move the ‘Saturation’ bar to the right until I am happy with how vibrant it looks. Usually I will move it up to around +10. You can play around with the ‘vibrance’ too.
Saturation is used to adjust the colour intensity of all the colours in the photos. ‘Vibrance’ is used to focus on enhancing duller colours.
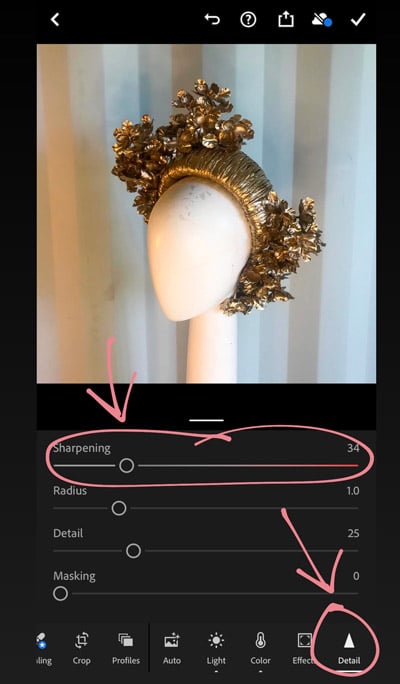
5. Make Your Image Sharper
The last step is to ‘detail’ your images. This makes the image sharper and therefore easier to see the details on the hat.
Tap on ‘Detail’ and move the top line ‘Sharpening’ to the right to around 34.
The sharpening tool sharpens your image which is great if you have intricate detail on your hat as it will show these more clearly.
You can have a play around with the other settings to see what they do, and to see if there are any you’d also like to use. Try and make the photo as close to what your hat colour looks like in natural sunlight.
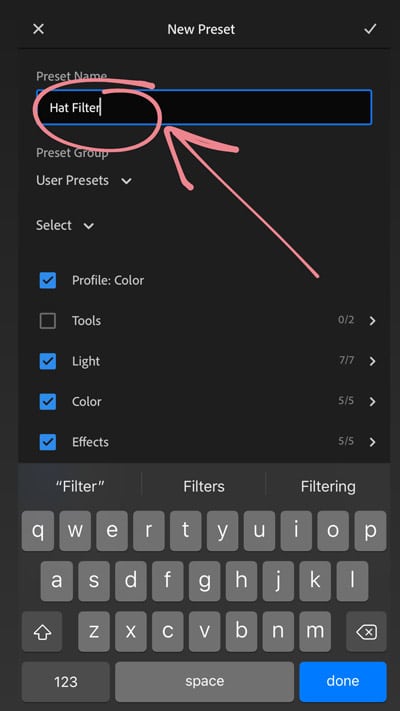
6. Create a Preset
Once you are happy with your photo, there is a little hack to use here. Making a ‘Preset’ will save all the edits you have just made to your photo and make it into a ‘preset filter’ so next time you want to edit a photo, you can use that and it will automatically edit your photo.
To do this, tap the three dots in the top right hand corner.

Tap on ‘Create Preset’.

Name your filter whatever you like- something like ‘Hat Filter’ will do.
Tap the top right tick and it will be saved.
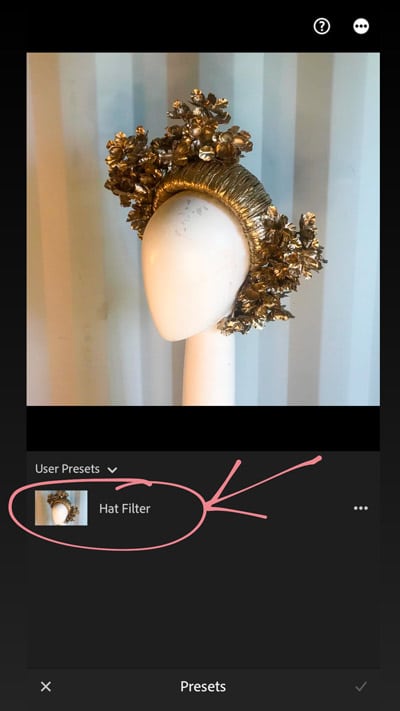
The next time you want to edit a photo using your preset filter, on the bottom of the screen, scroll to the right till you get to ‘Presets’.
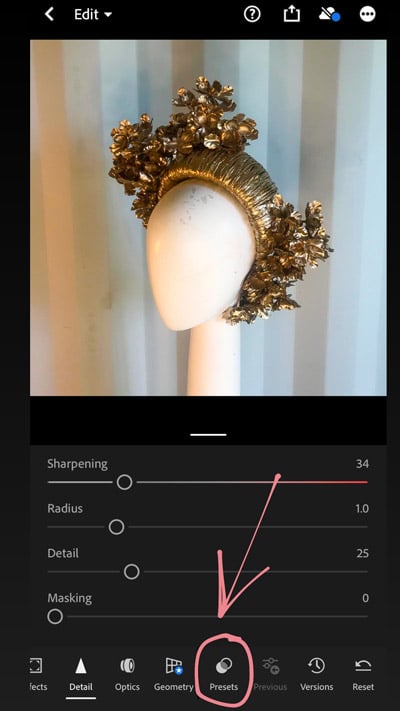
Tap on it and your saved filters will be shown. Tap on the filter you want to use and it will automatically edit your photo accordingly.
7. Save Your Photo
Lastly, to save your new edited photo, tap on the top button that looks like a square with an arrow, then tap on ‘Export to Camera Roll’.
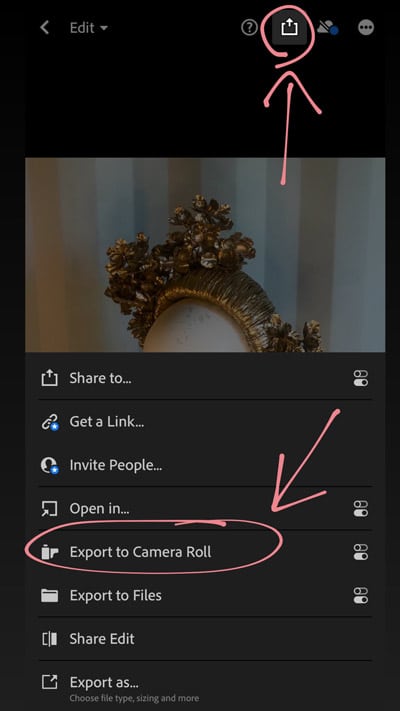
This will have your photo saved to your camera roll in your phone ready to use.
And there you have it, a quick and easy guide to brightening up your photos. This isn’t just useful for hats but for all photos!
Do you have any tips for editing your millinery photos? What software or apps do you use? Share them in the comments below!

Women`s White Straw Wide Brim fedora hat🤍 AU$450
Perfect for the woman who desires uniqueness in themselves.
A soft straw capeline hand blocked using Millinery tools of the trade with a lustrous white large double petersham bow
Handmade in Australia
Glamorous and Sensational.
Available at www.millinerymarket.com/en/listings/556116
Oct 29

JANE 💗 AU $275
A gorgeous headpiece in Jinsin and metallic sequin film flowers all on a headband. Easy to wear but super striking.
Available at www.millinerymarket.com/en/listings/556123
Oct 28
Kelsey 🩷AU$295
Crafted with an eye-catching pink palette, this exquisite "face hugger" headpiece is the perfect way to make a bold, unforgettable statement. Wear it to elevate your style and distinguish yourself from the crowd.
Available at www.millinerymarket.com/en/listings/556006
#millinery #melbournecup #fascinator #hat #headband #oaksday #fashion #racingfashion #fashion
Oct 28
Pearl 💛 AU$285
A lovely wide brim, encrusted with pearl beads on the crown. Has an adjustable drawstring to ensure a perfect fit. Elastic to the back of the neck holds this piece securely. Size 58cm.
Available at www.millinerymarket.com/en/listings/556003
Oct 28
Kiara - Women`s Brown leather headpiece 🤎 AU$370
Kiara - Women`s Brown Leather Headpiece 🤎 AU$370
A gorgeous bold brown abstract leather headpiece.
To look gorgeous and complete your outfit with a beautifully handcrafted piece, leather, feathers and veiling headpiece
Perfect for the woman who wants to feel divine and striking
A gorgeous bold leather teardrop 3D piece
With a gorgeous large leather flower and veiling in brown to feel amazing in the crowd
Available at www.millinerymarket.com/556086
Oct 12
Victoria Pink Buntal Headpiece with double bow 🎀 AU$360
Look and feel glamorous with this petite Pink double bow buntal button headpiece!
Hand crafted, this headpiece is crafted from a dusty pink straw buntal, with a simple yet striking veil net and a large Pink petersham double bow with crystals to compliment your look.
The headpiece arrives packaged in a hat box with acid free tissue paper and hat box shipper for extra protection.
Available at www.millinerymarket.com/556088
Oct 12
MISS LOUISE 💗 AU $375
Miss Louise, is a two toned pink and cream straw teardrop style shape and the trim hand wired tulle wrapped flowers with a beaded centre.
The attachment to the head has a comb and elastic.
Available at www.millinerymarket.com/555998
Oct 12
ZARA 💛 AU$359
`Zara` features a stunning hand-blocked crown headpiece covered in sparkle fabric, adorned with a striking yellow feather flower, and finished with two leather-wrapped halos that add height and wow-factor.
Comfortable and lightweight with secure elastic fastening for effortless all-day wear. Perfect for your next race day or Fashions on the Field event.
Available at www.millinerymarket.com/556043
Oct 11
🧡AVA🧡 AU$220
Looking for something a bit different to everyone ?
Bright orange koolie style hat with a big vintage flower
Light weight, comes with elastic.
Available at www.millinerymarket.com/556048
Oct 11
LAYLA 💙 AU$370
Look stunning with this gorgeous all Leather Teardrop headpiece with my signature abstract leather trims and a stunning net veil to compliment your look. Handcrafted using a wooden hat block to create this teardrop headpiece, it is crafted from leather using Paris Net in a striking Blue leather hide and features the abstract trims to compliment the headpiece even more!
With a petersham bow as an insert, a black hat elastic to secure on your head comfortably and a beautiful cotton liner.
The headpiece arrives packaged in a hat box with acid free tissue paper and hat box shipper for extra protection.
Available at https://www.millinerymarket.com/556087
Oct 11
Amalia - Pink Sparkle Pillbox with Feather Flowers 💞 AU$349
`Amalia` returns for SS25, featuring a fun pink sparkle fabric covered pillbox adorned with three delicate feather flowers. Curled quills create beautiful movement and add dramatic height to this eye-catching piece.
Lightweight and comfortable with secure elastic fastening for all-day wear. Perfect for your next Spring Racing or Fashions on the Field event.
Available at www.millinerymarket.com/556042
Oct 3
BLU PROFONDO Baby Blue Parisisal Cocktail Hat💙🩵 AU$500
Fall in love with the beautiful blue tones of the "BLU PROFONDO" cocktail hat. This stunning piece is meticulously crafted from luxurious baby blue Parisisal and features exquisite navy and baby blue detailing, making it a versatile and elegant addition to any outfit.
Handmade with precision in Melbourne, Australia, this headpiece is designed for comfort and ease of wear with a secure elastic attachment. Perfect for a race day, a wedding, or a special event, this hat includes a complimentary storage box for safekeeping, ensuring its beauty endures.
Customisation Available
If you love this design but would like a custom change to match an outfit you already have in mind, please feel free to contact us to discuss a bespoke creation.
Available at www.millinerymarket.com/555941
#fascinator #RaceDayStyle #racingfashion #millinery #fashionsonthefield #millinerylove #DerbyDayStyle #fashion #whitehat #flemington #derbydayhats #derbyday #hat #melbournecup #fotf
Oct 3
Ivory Swiss Straw Button🤍 US $115
A lovely textured chenille swiss braid button with a double crinoline bow. This is a cute and classy little piece, with a hair elastic that can be customized to your hair color.
Available at www.millinerymarket.com/en/listings/555894
Jul 3
Lavender Button 💜 AU$70/week
Available at www.millinerymarket.com/en/listings/555711
.
.
.
#millinery #hats #hathire #millinerysale #hatrental #hatsforsale #millinerylove #millinerydesign #hatlover #headwear #springracing #melbournecup #springcarnival #racedaystyle #fascinators #headpieces #hatsofinstagram #fashionheadwear #millinerytrends #hatobsession #hat #millinerymarket #millineryhire #derbyday #oaksday #fascinator #fascinatorhire #boaterhat #flowercrown
Oct 27
Floating Rose 🩷💗 AU$359
An exquisite floating headpiece embellished with delicate baby pink sinamay roses, accented by center crystals and adorned with soft goose feather leaves. The piece is bordered with a beautiful starbright braid, providing a dazzling finishing touch.
Available at www.millinerymarket.com/en/listings/555638
.
.
.
#millinery #hats #hathire #millinerysale #hatrental #hatsforsale #millinerylove #millinerydesign #hatlover #headwear #springracing #melbournecup #springcarnival #racedaystyle #fascinators #headpieces #hatsofinstagram #fashionheadwear #millinerytrends #hatobsession #hat #millinerymarket #millineryhire #derbyday #oaksday #fascinator #fascinatorhire #boaterhat #flowercrown
Oct 16
Black Beauty 🖤🤍🖤 AU$325
Its so fine because of the shine.....Front facing percher with the most amazing sparkle from the black braid. Black and white flowers just add to the drama.
Available at www.millinerymarket.com/en/listings/554950
.
.
.
#millinery #hats #hathire #millinerysale #hatrental #hatsforsale #millinerylove #millinerydesign #hatlover #headwear #springracing #melbournecup #springcarnival #racedaystyle #fascinators #headpieces #hatsofinstagram #fashionheadwear #millinerytrends #hatobsession #hat #millinerymarket #millineryhire #derbyday #oaksday #fascinator #fascinatorhire #boaterhat #flowercrown
Oct 13
Bridgette 🤍🖤🤍 AU$355
Black and ivory front percher, hand beaded with glitter leaf trim. Perfect Autumn/Winter millinery. Lightweight and easy to wear custom headband. Run don’t walk for this one ➡️ 🖤
Available at www.millinerymarket.com/en/listings/555226
.
.
.
#millinery #hats #hathire #millinerysale #hatrental #hatsforsale #millinerylove #millinerydesign #hatlover #headwear #springracing #melbournecup #springcarnival #racedaystyle #fascinators #headpieces #hatsofinstagram #fashionheadwear #millinerytrends #hatobsession #hat #millinerymarket #millineryhire #derbyday #oaksday #fascinator #fascinatorhire #boaterhat #flowercrown
Oct 13
Black and White Boater Hat 🖤🤍🖤 AU$360
This black and white boater hat is ideal for race wear, especially Derby Day.
It is worn as a percher and measures approximately 40cm (15.5 inches) across. This style suits most face shapes and is comfortable to wear.
It is positioned on the head with hat elastic.
Available at www.millinerymarket.com/en/listings/555651
.
.
.
#millinery #hats #hathire #millinerysale #hatrental #hatsforsale #millinerylove #millinerydesign #hatlover #headwear #springracing #melbournecup #springcarnival #racedaystyle #fascinators #headpieces #hatsofinstagram #fashionheadwear #millinerytrends #hatobsession #hat #millinerymarket #millineryhire #derbyday #oaksday #fascinator #fascinatorhire #boaterhat #flowercrown
Oct 13
Pink Roses 💓 AU$50/week hire
Three handmade pink cotton roses adorn a wide pink headband.
Available at www.millinerymarket.com/en/listings/555561
.
.
.
#millinery #hats #hathire #millinerysale #hatrental #hatsforsale #millinerylove #millinerydesign #hatlover #headwear #springracing #melbournecup #springcarnival #racedaystyle #fascinators #headpieces #hatsofinstagram #fashionheadwear #millinerytrends #hatobsession #hat #millinerymarket #millineryhire #derbyday #oaksday #fascinator #fascinatorhire #boaterhat #flowercrown
Oct 12
Hot Pink Dior Brim Hat 🩷 AU$360
This Hot Pink Dior Brim Hat is an elegant choice that’s ideal for race wear.
It is worn as a percher and measures approximately 40cm (15.5 inches) across. This style suits most face shapes and is comfortable to wear.
It is positioned on the head with hat elastic.
Available at www.millinerymarket.com/en/listings/555650
.
.
.
#millinery #hats #hathire #millinerysale #hatrental #hatsforsale #millinerylove #millinerydesign #hatlover #headwear #springracing #melbournecup #springcarnival #racedaystyle #fascinators #headpieces #hatsofinstagram #fashionheadwear #millinerytrends #hatobsession #hat #millinerymarket #millineryhire #derbyday #oaksday #fascinator #fascinatorhire #boaterhat #flowercrown
Oct 12
Beaded Shell Flower Crown ~ Pink & Green 🩷💚 AU$65/week hire
A stunning combination of pink and green shell beads and glass pearl beads have been used to create the beautiful beaded flowers on this piece. Flowers are attached to a metallic gold structure with a comb to assist with holding headpiece in place.
*please note as shells are a natural product please allow some slight colour variation in the beads.
Available at www.millinerymarket.com/en/listings/555559
.
.
.
#millinery #hats #hathire #millinerysale #hatrental #hatsforsale #millinerylove #millinerydesign #hatlover #headwear #springracing #melbournecup #springcarnival #racedaystyle #fascinators #headpieces #hatsofinstagram #fashionheadwear #millinerytrends #hatobsession #hat #millinerymarket #millineryhire #derbyday #oaksday #fascinator #fascinatorhire #boaterhat #flowercrown
Oct 12
Butter Yellow Floral Headband 💛 AU$365
Here comes the sun! Butter yellow wide sinamay headband with a stunning array of lemon and butter yellow feather flowers. On an easy to wear velvet covered headband.
Available at www.millinerymarket.com/en/listings/555635
.
.
.
#millinery #hats #hathire #millinerysale #hatrental #hatsforsale #millinerylove #millinerydesign #hatlover #headwear #springracing #melbournecup #springcarnival #racedaystyle #fascinators #headpieces #hatsofinstagram #fashionheadwear #millinerytrends #hatobsession #hat #millinerymarket #millineryhire #derbyday #oaksday #fascinator #fascinatorhire #boaterhat #flowercrown
Oct 12
Magenta Feather Burst Percher💞 AU$495
A rich magenta parisisal base adorned with an explosion of hand cut magenta, and mauve feather flowers and floating feathers.
Elastic and comb.
Available at www.millinerymarket.com/en/listings/555552
.
.
.
#millinery #hats #hathire #millinerysale #hatrental #hatsforsale #millinerylove #millinerydesign #hatlover #headwear #springracing #melbournecup #springcarnival #racedaystyle #fascinators #headpieces #hatsofinstagram #fashionheadwear #millinerytrends #hatobsession #hat #millinerymarket #millineryhire #derbyday #oaksday #fascinator #fascinatorhire #boaterhat #flowercrown
Oct 12
Cornflower Mist Percher 💙🩵 AU$495
A stunning vintage racello straw has been hand dyed and picks up colours of cornflower and lilac. This provided inspiration for the Cobalt, Cornflower and Lilac feather flowers with a mist of super fine veiling to finish.
Available at www.millinerymarket.com/en/listings/555553
.
.
.
#millinery #hats #hathire #millinerysale #hatrental #hatsforsale #millinerylove #millinerydesign #hatlover #headwear #springracing #melbournecup #springcarnival #racedaystyle #fascinators #headpieces #hatsofinstagram #fashionheadwear #millinerytrends #hatobsession #hat #millinerymarket #millineryhire #derbyday #oaksday #fascinator #fascinatorhire #boaterhat #flowercrown
Oct 12
Madeline Saucer in pink straw with white edge Spring Racewear 💗 AU$580
Madeline Saucer is a curved saucer shape that is finished with a chic white lace straw edge. This style is one size fits all and is secured to the head with a shaped wire headband, elastic and comb.in pink straw with white edge Spring Racewear Headpiece.
Available at www.millinerymarket.com/en/listings/555587
🩷
.
.
.
#millinery #hats #hathire #millinerysale #hatrental #hatsforsale #millinerylove #millinerydesign #hatlover #headwear #springracing #melbournecup #springcarnival #racedaystyle #fascinators #headpieces #hatsofinstagram #fashionheadwear #millinerytrends #hatobsession #hat #millinerymarket #millineryhire #derbyday #oaksday #fascinator #fascinatorhire #boaterhat #flowercrown
Oct 11
Cristina front of the head pillbox in pale pink with a knot 🤍 AU$480
The Cristina headpiece is a front-of-head angular shape with a knotted trim in a pale pink straw. This style is one size fits all and is secured to the head with a shaped base, elastic and comb.
Available at www.millinerymarket.com/en/listings/555579
.
.
.
#millinery #hats #hathire #millinerysale #hatrental #hatsforsale #millinerylove #millinerydesign #hatlover #headwear #springracing #melbournecup #springcarnival #racedaystyle #fascinators #headpieces #hatsofinstagram #fashionheadwear #millinerytrends #hatobsession #hat #millinerymarket #millineryhire #derbyday #oaksday #fascinator #fascinatorhire #boaterhat #flowercrown
Oct 11
Monique Saucer in Textured Straw Silk Poppy Flower Trim in Red❤️ AU$620
The Monique Sauver is a gently curved saucer shape finished with matching patent braid on the under edge leaving a smooth top and rich silk poppies that are hand-crafted in-house. This style is one size fits all and is secured to the head with a shaped wire headband, elastic and comb.
Available at www.millinerymarket.com/en/listings/555594
.
.
.
#millinery #hats #hathire #millinerysale #hatrental #hatsforsale #millinerylove #millinerydesign #hatlover #headwear #springracing #melbournecup #springcarnival #racedaystyle #fascinators #headpieces #hatsofinstagram #fashionheadwear #millinerytrends #hatobsession #hat #millinerymarket #millineryhire #derbyday #oaksday #fascinator #fascinatorhire #boaterhat #flowercrown
Oct 11
MISS NIKKI HEADPIECE 🤩💫⭐️🌟✨🩷 AU$340
Our Miss Nikki fascinator will always stand out in the crowd. She definitely is a showstopper! Miss Nikki features a metallic golden signature crest and hand made red, pink and purple flowers cascading down the right side of the face. She is a one off piece.
You can gently squeeze or stretch the headband to adjust to the tightness at which you would like to wear it. The small teeth at the front will hold it in place for all day wear.
Available at www.millinerymarket.com/en/listings/555632
.
.
.
#millinery #hats #hathire #millinerysale #hatrental #hatsforsale #millinerylove #millinerydesign #hatlover #headwear #springracing #melbournecup #springcarnival #racedaystyle #fascinators #headpieces #hatsofinstagram #fashionheadwear #millinerytrends #hatobsession #hat #millinerymarket #millineryhire #derbyday #oaksday #fascinator #fascinatorhire #boaterhat #flowercrown
Oct 10
Pink and Blue Flowers 💐 AU$70/week hire
A large pink peony is the focal point of this design, while the pale blue flowers and the freshness of the green leaves add to the beautiful spring colour pallet.
Available at www.millinerymarket.com/en/listings/555560
.
.
.
#millinery #hats #hathire #millinerysale #hatrental #hatsforsale #millinerylove #millinerydesign #hatlover #headwear #springracing #melbournecup #springcarnival #racedaystyle #fascinators #headpieces #hatsofinstagram #fashionheadwear #millinerytrends #hatobsession #hat #millinerymarket #millineryhire #derbyday #oaksday #fascinator #fascinatorhire #boaterhat #flowercrown
Oct 10
Pink or blue? 🩷💙
Check out these stunning perchers for hire at @millinerymarket from @adorncollection.hire 😍
Available at www.millinerymarket.com/en/listings/555526
Oct 10
LOLA 🩵 AU$275
Soft blue headpiece adorned with hand made spray of flowers. Secured with elastic to the back of the neck.
Available at www.millinerymarket.com/en/listings/555495
.
.
.
#millinery #hats #hathire #millinerysale #hatrental #hatsforsale #millinerylove #millinerydesign #hatlover #headwear #springracing #melbournecup #springcarnival #racedaystyle #fascinators #headpieces #hatsofinstagram #fashionheadwear #millinerytrends #hatobsession #hat #millinerymarket #millineryhire #derbyday #oaksday #fascinator #fascinatorhire #boaterhat #flowercrown
Aug 19
LISA💛 AU$145
Lemon Swiss straw with swirls. Comfortable and easy to wear. Secured with elastic to the back of the neck.
Available at www.millinerymarket.com/en/listings/555493
.
.
.
#millinery #hats #hathire #millinerysale #hatrental #hatsforsale #millinerylove #millinerydesign #hatlover #headwear #springracing #melbournecup #springcarnival #racedaystyle #fascinators #headpieces #hatsofinstagram #fashionheadwear #millinerytrends #hatobsession #hat #millinerymarket #millineryhire #derbyday #oaksday #fascinator #fascinatorhire #boaterhat #flowercrown
Aug 19
Anna 🩷 AU$325
Stunning bright pink boater with matching satin ribbon and dramatic rear bow. Made from hand woven Panama straw. Brim 11cm wide. Size medium.
Available at www.millinerymarket.com/en/listings/555486
.
.
.
#millinery #hats #hathire #millinerysale #hatrental #hatsforsale #millinerylove #millinerydesign #hatlover #headwear #springracing #melbournecup #springcarnival #racedaystyle #fascinators #headpieces #hatsofinstagram #fashionheadwear #millinerytrends #hatobsession #hat #millinerymarket #millineryhire #derbyday #oaksday #fascinator #fascinatorhire #boaterhat #flowercrown
Aug 19
Roma ❤️ AU$255
Lovely piece designed to be worn on the right side of the head. Covered with fabric and trimmed with quills.
Available at www.millinerymarket.com/en/listings/555488
.
.
.
#millinery #hats #hathire #millinerysale #hatrental #hatsforsale #millinerylove #millinerydesign #hatlover #headwear #springracing #melbournecup #springcarnival #racedaystyle #fascinators #headpieces #hatsofinstagram #fashionheadwear #millinerytrends #hatobsession #hat #millinerymarket #millineryhire #derbyday #oaksday #fascinator #fascinatorhire #boaterhat #flowercrown
Aug 19
Lucy 🩵 AU$245
Soft blue headband adorned with hand made beaded flowers. Secured with elastic to the back of the neck.
Available at www.millinerymarket.com/en/listings/555496
.
.
.
#millinery #hats #hathire #millinerysale #hatrental #hatsforsale #millinerylove #millinerydesign #hatlover #headwear #springracing #melbournecup #springcarnival #racedaystyle #fascinators #headpieces #hatsofinstagram #fashionheadwear #millinerytrends #hatobsession #hat #millinerymarket #millineryhire #derbyday #oaksday #fascinator #fascinatorhire #boaterhat #flowercrown
Aug 19
Betty AU$145 🖤
Cream textured straw with black velvet underlay. Sits comfortably on the right side of the head. Held securely with elastic to the back of the head.
Available at www.millinerymarket.com/en/listings/555204
Jul 10
Canary 💛 AU$135
Textured straw headband with bead trim. Light and comfortable to wear. Held securely with elastic to the back of the head.
Available at www.millinerymarket.com/en/listings/555197
Jul 9
Sage Vine Facehugger US$160
This parisisal facehugger has been hand dyed to the perfect sage green color. It features a crinoline swirl and beautiful vine winding its way around the headpiece. A double wound elastic secures this piece to the head.
Available at www.millinerymarket.com/en/listings/555387
Jul 9
Alexis 💐 $295 AU
A golden headband adorned with hand painted and tooled leather flowers and leaves.
Available at www.millinerymarket.com/en/listings/555352
.
.
.
#millinery #hats #hathire #millinerysale #hatrental #hatsforsale #millinerylove #millinerydesign #hatlover #headwear #springracing #melbournecup #springcarnival #racedaystyle #fascinators #headpieces #hatsofinstagram #fashionheadwear #millinerytrends #hatobsession #hat #millinerymarket #millineryhire #derbyday #oaksday #fascinator #fascinatorhire #boaterhat #flowercrown
Jun 19
Black and pink percher with vintage flowers 🌸AU$380
Gorgeous and light to wear. Vintage cascading flowers, on pink crin swirl.
Available at www.millinerymarket.com/en/listings/555292
May 13
Mrs Orchid headpiece ✨ AU $330
Mrs Orchid fascinator will always stand out in the crowd. She features a fuchsia pink signature crest (with silver back) with hand made bubblegum pink and red orchids cascading down the right side of the face.
You can gently squeeze or stretch the headband to adjust to the tightness at which you would like to wear it. The small teeth at the front will hold it in place for all day wear.
Available at www.millinerymarket.com/en/listings/555192
Apr 29
Item 182 - Velvet Vision ❤️🖤 AU $375
A beautiful black pleated satin rear facing pillbox. Handcrafted red and green velvet flowers and leaves. Easy to wear with elastic and comb. Autumn/Winter millinery Essential.❤️ ❤️ ❤️
Available at www.millinerymarket.com/en/listings/555240
Apr 29
RUBY ❤️ AU $245
A stunning bright red lace wide brim hat. Designed to perch on the head to one side, making it a one size fits all piece. The hat measures 52cm in diameter.
Available at www.millinerymarket.com/en/listings/555202
Apr 24
Ivory and rose saucer hat 🤍 £190
Ivory sinamay saucer hat, 16 inch. Ivory statement feathers, with beautiful vintage inspired statement silk flowers. Attaches to the head via hairband.
Available at www.millinerymarket.com/en/listings/555255
Apr 24
Pink floral halo 💗 £190
Pink sinamay halo, pretty rose flower, leaf detail, matching feather and quill.
Available at www.millinerymarket.com/en/listings/555253
Apr 24
I’m your Lady padded headband SALE❣️ AU $80
Red velvet padded headband with 3 red leather hand crafted roses
RRP $125 SALE $80
Available at www.millinerymarket.com/en/listings/555229
Apr 22
Red and White Headband Headpiece ❤️🤍 AU $235
This elegant headband is the perfect finishing touch to an outfit.
This style flatters almost all ages and face shapes and is very comfortable to wear.
It measures approximately 43cm (17 inches) from end to end across the head and is approximately 8cm (3 inches) at its widest point.
It is positioned snuggly on the head with hat elastic and two small metal combs.
Available at www.millinerymarket.com/en/listings/555164
.
.
.
#millinery #hats #hathire #millinerysale #hatrental #hatsforsale #millinerylove #millinerydesign #hatlover #headwear #springracing #melbournecup #springcarnival #racedaystyle #fascinators #headpieces #hatsofinstagram #fashionheadwear #millinerytrends #hatobsession #hat #millinerymarket #millineryhire #derbyday #oaksday #fascinator #fascinatorhire #boaterhat #flowercrown
Apr 22
